27 June 2017

Lost and Found

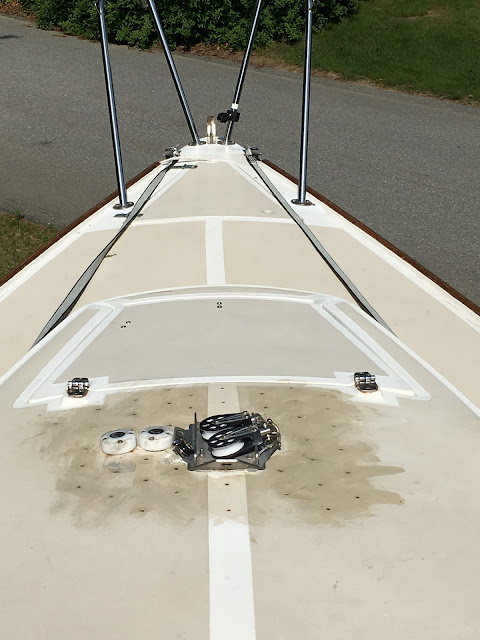
With my launch date only a few days away, I had almost everything checked, tested, loaded, and readied to go.  Everything, that is, except one very important piece: the backstay plate -- a critical part of the standing rigging that helps to hold the mast upright and in place.

Usually, when I haul out the boat each November, I detach the backstay plate and stow it with other removable parts of the rigging, such as the mainsheet blocks and the boomvang.  This year, I could not find the backstay plate -- a small triangular piece of metal that links the backstay (which runs to the top of the mast) to the transom and the mainsheet.  I could not launch the boat if I were missing this piece.  For want of a nail, the kingdom would be lost.....


On Friday, five days from launch, I spent nearly four anxious hours, deeply aggravated and inconsolably frustrated, searching for that damn metal plate.  I looked in the boat; I looked in all my boat storage totes; I looked in the garage; I looked at my work bench; I looked in my study; I looked in the basement; I looked in the mudroom; I looked in our bedroom; I looked in the kitchen; I looked in Dylan's room; I even looked in the trunk of the car.  Nothing.   ARRRRRGGGHHHH!!!!!


I was falling into a really foul and rotten mood, annoyed with my failing memory.  I am a reasonably organized guy; friends might say even a bit OCD in some ways.  My space may seem like chaos sometimes, but that is only an illusion.  There is method to my madness and everything is in its proper place -- until its not.  Every now and then I fall apart.  Now, at age 55, I was losing it.  I misplaced my wallet six times in the last two weeks.  I lost my car keys for a day.  I spent two days looking for an anti-theft bar and lock I purchased weeks ago for the outboard motor.  Once I went around the house looking for my glasses, only to realize after a half-hour or so that I was wearing them!


Dejected, I sat on the back porch, sipping a beer, phone in hand to check online how much D&R Marine (who stock parts for O'Day boats) would charge for overnight delivery of a replacement part. Suddenly, an epiphany: Could I have possibly left it attached to the backstay last November?  I walked across the yard in anxious trepidation, and sure enough there it was!

Sort of mimics the look on my face when I found the "missing" backstay plate.....


25 June 2017

Spring Training

Honing and Toning My Bottom
The most significant repair -- and the priority job at the top of my list -- involved fixing the damage to the front of the keel, where we struck that uncharted rock last year.  But before I could get to it, I first had to raise the boat just a tad using the adjustable-height boat stands, then move the wooden keel blocks (upon which the boat effectively rests) back a few inches, before lowering the boat back down again.  That was a breath-holding exercise.

 Damaged keel, now fully exposed and accessible....

My friend, Ric, lent me some West System epoxy.  Following his advice, I mixed it to a oatmeal-like consistency, using "mmmmm about so much" microfiber adhesive filler.

Note to Self: epoxy bonds work through a chemical reaction, which gives off heat.  If you mix this stuff in a plastic SOLO cup, the plastic cup will melt.  If you mix it in a glass jar, the glass jar will get very HOT....

Then, using a wooden spatula, I began to apply epoxy to the damaged area of the keel, smoothing it out with an old plastic credit card.  I forgot all about gravity, of course, so it got kinda drippy and lumpy as it hardened.  But I did have two good science lessons during this repair job: heat and gravity.


I had to put on several separate coats, waiting for each one to dry and cure.  This meant I went through a bunch of plastic SOLO cups.  No beer pong for a while.

Note to Loved Ones: a power sander (with an interchangeable buffing head) would be a great man-tool gift next year (if any of you are reading this)....

Finally, I put on goggles and a gauze face-mask, and got to work hand-sanding the patch to smooth it out and shape it to the contours of the keel.

 Hand-sanded to shape....

Finally, I covered the patch with a coat of marine ablative paint.

Good as new -- sort of....

The touch-up didn't exactly match the hue of the older bottom coat (from the same can of paint), but it is below the waterline -- who will notice?

While I was down there working on the keel, I also thought it best to clean and touch up the centerboard.  Last fall I purchased some additional wood blocks from a small sawmill in a nearby town, and was able to set the boat a little higher on the stands to enable better access to the centerboard.  The recess in the keel was fouled with a thick collection of barnacles, which I dislodged with a plastic ice scraper (they are easier to remove once they are dead and dried).


It has been a loooooooong time since anyone cleaned up in there....

The pendant is in reasonably good shape, but the board itself is in need of some TLC.  So, I pressure-washed it, scraped off some of the old flaking ablative, and repainted it.

Before.....

....and After

I also had to clean barnacles from around and on the transducer face.  That was a bit more delicate work -- god forbid I break the thru-hull device!  I picked up some special anti-fouling transducer paint ($15), which can be applied directly to the sensor's face.

That cleaned up nicely....


Strengthening My Top
My other major repair involved the cabin top.  When I bought the boat a few years ago, it already had some cracks or "alligatoring" in several areas of the deck.  These have long been a nagging concern to me, although I continued to hope that they were merely superficial and posed no structural threats.  After all, a wet balsa wood core would mean a big and costly repair job.  "It is known."  When I finally checked it more carefully this spring, tapping with a plastic-head mallet revealed several areas suffering from delamination and perhaps even water penetration.  Even without a moisture meter it was clear that something needed to be done.

 Cracking on the cabin top around the mast step....

Ed, my boat guy, advised that to re-do the deck, or even just the cabin top, would be such an expensive job that I would never get my money back if I one day sold the boat.  He knows I can't afford a newer, bigger boat (yet), as much as I would like one, so he mentioned that I try an alternative fix.  He emphasized this was something he would never do to a client's boat, yet suggested that it just might extend the boat's life if I could strengthen the deck around the mast step to support the stress on the rig when it was under load.  The plan called for drilling a series of 3/16" holes, about three to four inches apart, and injecting them with epoxy fill to harden the deck.

First, I drilled holes and poured in some acetone to dry out the wood underneath.... 

I mixed more of Ric's epoxy and, using plastic syringes from West Marine, injected the epoxy filler into the holes.

The epoxy overflowed onto the cabin top, and I had to wipe it up with a rag soaked in acetone....

Left with this rather ugly-looking mess, I now faced the prospect of painting the cabin top.  But that, it seemed, was prohibitive -- in terms of cost, time, energy, interest, and skills.  I am still not sure that my "drill-and-fill" repair job adequately fixed the problem.  Perhaps I will be obliged to rip open the cabin top next year and re-do it properly.  In that case, painting the deck seemed imprudent at present.  Instead, I opted to buy a few yards of non-skid adhesive ($50) and cover the area where I had drilled. We will see what Ed has to say about that when he assists with my launch and rig-up next week.

Several strips of adhesive non-skid surface to cover the mess and pretend it is not there....

I still don't know how effective this half-assed 'drill-and-fill' repair job was.  The Admiral has already declared her lack of faith in my handiwork, and her anxiety over the mast ripping out the cabin top one day while we are out sailing.  Stay tuned for updates.....


24 June 2017

Spring Lines


Piao under wrap, with the mast laying nearby -- I took the mast down off the horses after strong winter wind gusts twice knocked it over....

While we had a mild winter in southern New England this year, it was followed by a very crappy spring.  We had a lot of rain throughout most of the month of May, which delayed many boaters from getting to work on spring commissioning.  The guys from Brownell were grumbling that business was very slow in May.  I am usually in the water by mid-May -- certainly well before Memorial Day. 

I can't afford shrink-wrap, but these cheap tarps from Ocean State Job Lot generally last only one season....

But this year I did not get the tarp off Piao until mid-April, and then I had to wait almost until the beginning of June for a decent stretch of warm, dry weather to get to work on some important off-season repairs and upgrades.  Several of the smaller jobs entailed upgrades of a linear nature: running rigging, standing rigging, electronics, and plumbing.  Here's a brief recap:

Line #1
My first two seasons with Piao I struggled with an oversized furling line on the jib that did not roll neatly into the furling drum.  Last spring, I replaced it with a new line of smaller diameter, only to discover that smaller was not smaller enough -- the furler would still jam sometimes, usually when most inconvenient.

Old furling line, bulging out of the furling drum.... 

So this spring I made another trip over to R&W Rope and bought an even thinner line to install on the furler.  It seems to fit much better -- at least the drum can still rotate when all the line is rolled up inside.

New furling line rolled up nicely inside the drum.  And look at that kick-ass gasket coil!


Line #2
I also installed a remote VHF mic in the cockpit - a Christmas gift from my offspring.  I was finding it a bit troublesome to leave the cockpit and helm unattended when I needed to use the radio.  This should resolve that issue.  The biggest challenge with this job was fishing the electrical line through the inaccessible inner reaches of the lazerette to the access hole I drilled in the cabin wall.  Actually, the first hole I drilled was improperly aligned and came out not inside the lazerette but outside in the cockpit!  A little epoxy filled in that one and made it unnoticeable....sort of.

Can you hear me now?

Line #3
Last season, I had some problems getting the (upper) shrouds to tighten snuggly.  The turnbuckles were maxed out, and still the shrouds were a little loose and wobbly -- which caused me some concern for the mast and rig when sailing in a fresh breeze.  On the advice of Ed, my boat-guy, I purchased replacements shrouds (for about $200) and installed them myself.

The spreader boots were only two years old, but looked very worn and weathered....

Easy-peazy.  The only real challenge was ordering the proper size replacements for the weathered spreader boots (took me two tries), and fixing the shrouds securely to the spreader bar with seizing wire.

 The replacements look much nicer....


Line #4
The other year I purchased a "Tiller Tamer" from Davis Instruments.  Affixed to the top of the tiller, this device helps to secure a line between to port and starboard quarters of the boat in such a way that, when under tension, the line holds the tiller in a set position -- a sort of poor man's autopilot.  It is not a real autopilot, of course, and you could find yourself in some serious trouble if you treated it as one.  But it does assist well enough to enable the single-handed sailor to drop into the cabin for a radio check or a even a quick head call.

The "Tiller Tamer"....

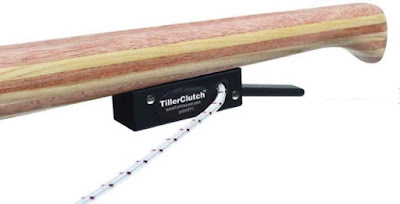
What I did not like about it, however, was that it was slow to set and release.  You turn a large screw knob to apply tension to the line and hold it in position.  So this year, after reading some reviews, I switched it out for a different product known as a "Tiller Clutch."  This mechanism mounts underneath the tiller, and enables one to tension or release a holding line with the mere flick of a finger.  It received endorsements from Practical Boat Owner, Practical Sailor, SailNet, and other forums.


Line #5
Much to my chagrin, I discovered that a number of bumble bees had taken up residence in the drain hose for the bilge pump.  While the prospect of fresh honey all season long was appealing, I could not figure out a way to harvest it in a painless manner.  I had no choice but to forcibly evict the illegal squatters.  Gotta Make America Great Again, right?


Dinghy Rehab

Launch Day Approaches....

Last year I had some issues with the inflatable dinghy.  One problem was very heavy barnacle growth on the sides of the bottom.  I had applied anti-fouling paint, but only to the middle part of the dinghy bottom.  Rookie mistake -- especially if you don't pull the dinghy from the water at least once a week or two to scrape and clean the bottom.

Remains of barnacle growth on the dinghy bottom....


In June, we finally got a sunny day and I chiseled off the dinghy bottom the dead, dried barnacles from last year using a plastic snow scrapper.  Then I scrubbed the bottom using boat soap and a rigid bristle brush, before power-washing the dinghy inside and out.  Finally, I applied a new coat of special anti-fouling paint for inflatables to the entire bottom and partly up the sides to the waterline.

Looking good....

Last year I also had some trouble with a mysterious vandal who damaged the dinghy, breaking  several of the floor boards and puncturing the rubber skin.  Patching the hole was easy, but replacing the floor boards proved more challenging than I expected.

Remains of the broken floor slats.... 

I made calls to five or six shops, from Fairhaven to Newport, but no one carried replacement floor boards for this (older model) dinghy.  Fortunately, I eventually procured a replacement set (of six boards) from Defender Marine -- only $99.  Meanwhile, a BOLO has been issued to the neighborhood watch in the hopes of deterring such nefarious vandalism in the future.  Geez, some people.....